

I just love owls. Who doesn't? I designed this little amigurumi beanie Owl for my son's nursery. I decided to stuff it with bean bag beans (details below), but it could be stuffed with regular batting or any other stuffing you want! I've put quite detailed assembly instructions below, as I find that the proper assembly is really what makes an amigurumi critter look great!
Pattern has been updated to include a video with full assembly instructions. Even a beginner-level crocheter could make this project in a few hours!
Please note that all commenting has been closed, please go to my new website www.homemadebygiggles.com to this post and comment there instead!

Materials:
- Worsted weight yarn of your choice
- 4mm crochet hook
- 2 x 9mm safety eyes
- Tapestry needle
- Stuffing material: batting OR bean bag filler + fabric closely matching main colour
Stitches: (click here for a good instruction guide for basic stitches)
ch - chain
sl st - slip stitch
sc - single crochet
sc2tog - single crochet 2 stitches together
hdc - half double crochet
dc - double crochet
tr - treble crochet
magic loop (instructions here)
PATTERN
General note: after the first round, the pieces are worked in a continuous fashion - you do not need to sl st at the end of each round. Because of this, I recommend using a stitch marker to keep track of where the current round started, in case you lose count during a round.
Body:
Round 1: 6 sc into magic loop, sl st into first stitch
Round 2: 2 sc in each st around (12 st)
Round 3: *2 sc in next st, sc in next st* repeat until end of round (18 st)
Round 4: *2 sc in next st, sc in next 2 st* repeat until end of round (24 st)
Round 5: *2 sc in next st, sc in next 3 st* repeat until end of round (30 st)
Round 6: *2 sc in next st, sc in next 4 st* repeat until end of round (36 st)
Round 7: sc in each st until end of round (36 st)
Rounds 8-16: repeat Round 7
Round 17: *2 sc in next st, sc in next 6 st, sc2tog twice, sc in next 6 st, 2 sc in next st* repeat 1 more time (36 st) ... for extra help on this round, see section at the bottom of the pattern
Rounds 18-21: repeat Round 17
sl st into first st of the round
Fasten off, leaving a long tail (you will sc this opening closed after stuffing)

Belly:
Round 1: 6 sc into magic loop, sl st into first stitch
Round 2: 2 sc in each st around (12 st)
Round 3: *2 sc in next st, sc in next st* repeat until end of round (18 st)
Round 4: *2 sc in next st, sc in next 2 st* repeat until end of round (24 st)
Round 5: *2 sc in next st, sc in next 3 st* repeat until end of round (30 st)
Round 6: *2 sc in next st, sc in next 4 st* repeat until end of round (36 st)
Round 7: *2 sc in next st, sc in next 5 st* repeat until end of round (42 st)
sl st into first st of the round
Fasten off, leaving a long tail for sewing

Eyes: (make 2)
Start with central eye color
Round 1: 6 sc into magic loop, sl st into first stitch
Round 2: 2 sc in each st around (12 st)
Switch colors to outer eye color via a sl st into next st
Round 3: Working in the back loops only, *2 sc in next st, sc in next st* repeat until end of round (18 st)
Round 1: 6 sc into magic loop, sl st into first stitch
Round 2: 2 sc in each st around (12 st)
Switch colors to outer eye color via a sl st into next st
Round 3: Working in the back loops only, *2 sc in next st, sc in next st* repeat until end of round (18 st)
sl st into first st of the round
Fasten off, leaving a long tail for sewing
Using eyelash color, join yarn anywhere along edge of eye, do 9 sc and fasten off

Wings: (make 2)
Round 1: 6 sc into magic loop, sl st into first stitch
Round 2: 2 sc in each st around (12 st)
Round 2: 2 sc in each st around (12 st)
Round 3: 2 sc in next st, hdc in next st, dc and tr in next st, dc in next st, hdc and sc in next st, sc in next st, *2 sc in next st, sc in next st* repeat between *'s until end of round (18 st)
Round 4: 2 sc in next st, sc in next 2 st, sc and hdc in next st, dc in next st, tr in next st, dc and hdc in next st, sc in next 2 st, *2 sc in next st, sc in next 2 st* repeat between *'s until end of round (24 st)
sl st into first st of the round
Fasten off, leaving a long tail for sewing

Foot: (make 2)
Note: when making your magic loop, leave a long tail as you will use this end for sewing
Round 1: 6 sc into magic loop, sl st into first stitch
Round 2: 2 sc in each st around (12 st)
Round 3: *2 sc in next st, sc in next st* repeat until end of round (18 st)
Round 2: 2 sc in each st around (12 st)
Round 3: *2 sc in next st, sc in next st* repeat until end of round (18 st)
sl st into next st
Round 4: ch 4, sl st into same st, *sc in next st, ch 4, sl st into same st* repeat between *'s 2 more times (4 toes total)
Fasten off

Beak:
Ch 4, sc into 2nd ch from hook, hdc in next ch, dc in last ch
Fasten off, leaving a long tail for sewing
Hair:
Optional, of course. Cut 3 strands of yarn approx 3" long. Assembly instructions are below.
Some extra help on Round 17 of the Body, as some have been asking for more details:
Here is the instruction: Round 17: *2 sc in next st, sc in next 6 st, sc2tog twice, sc in next 6 st, 2 sc in next st* repeat 1 more time (36 st)
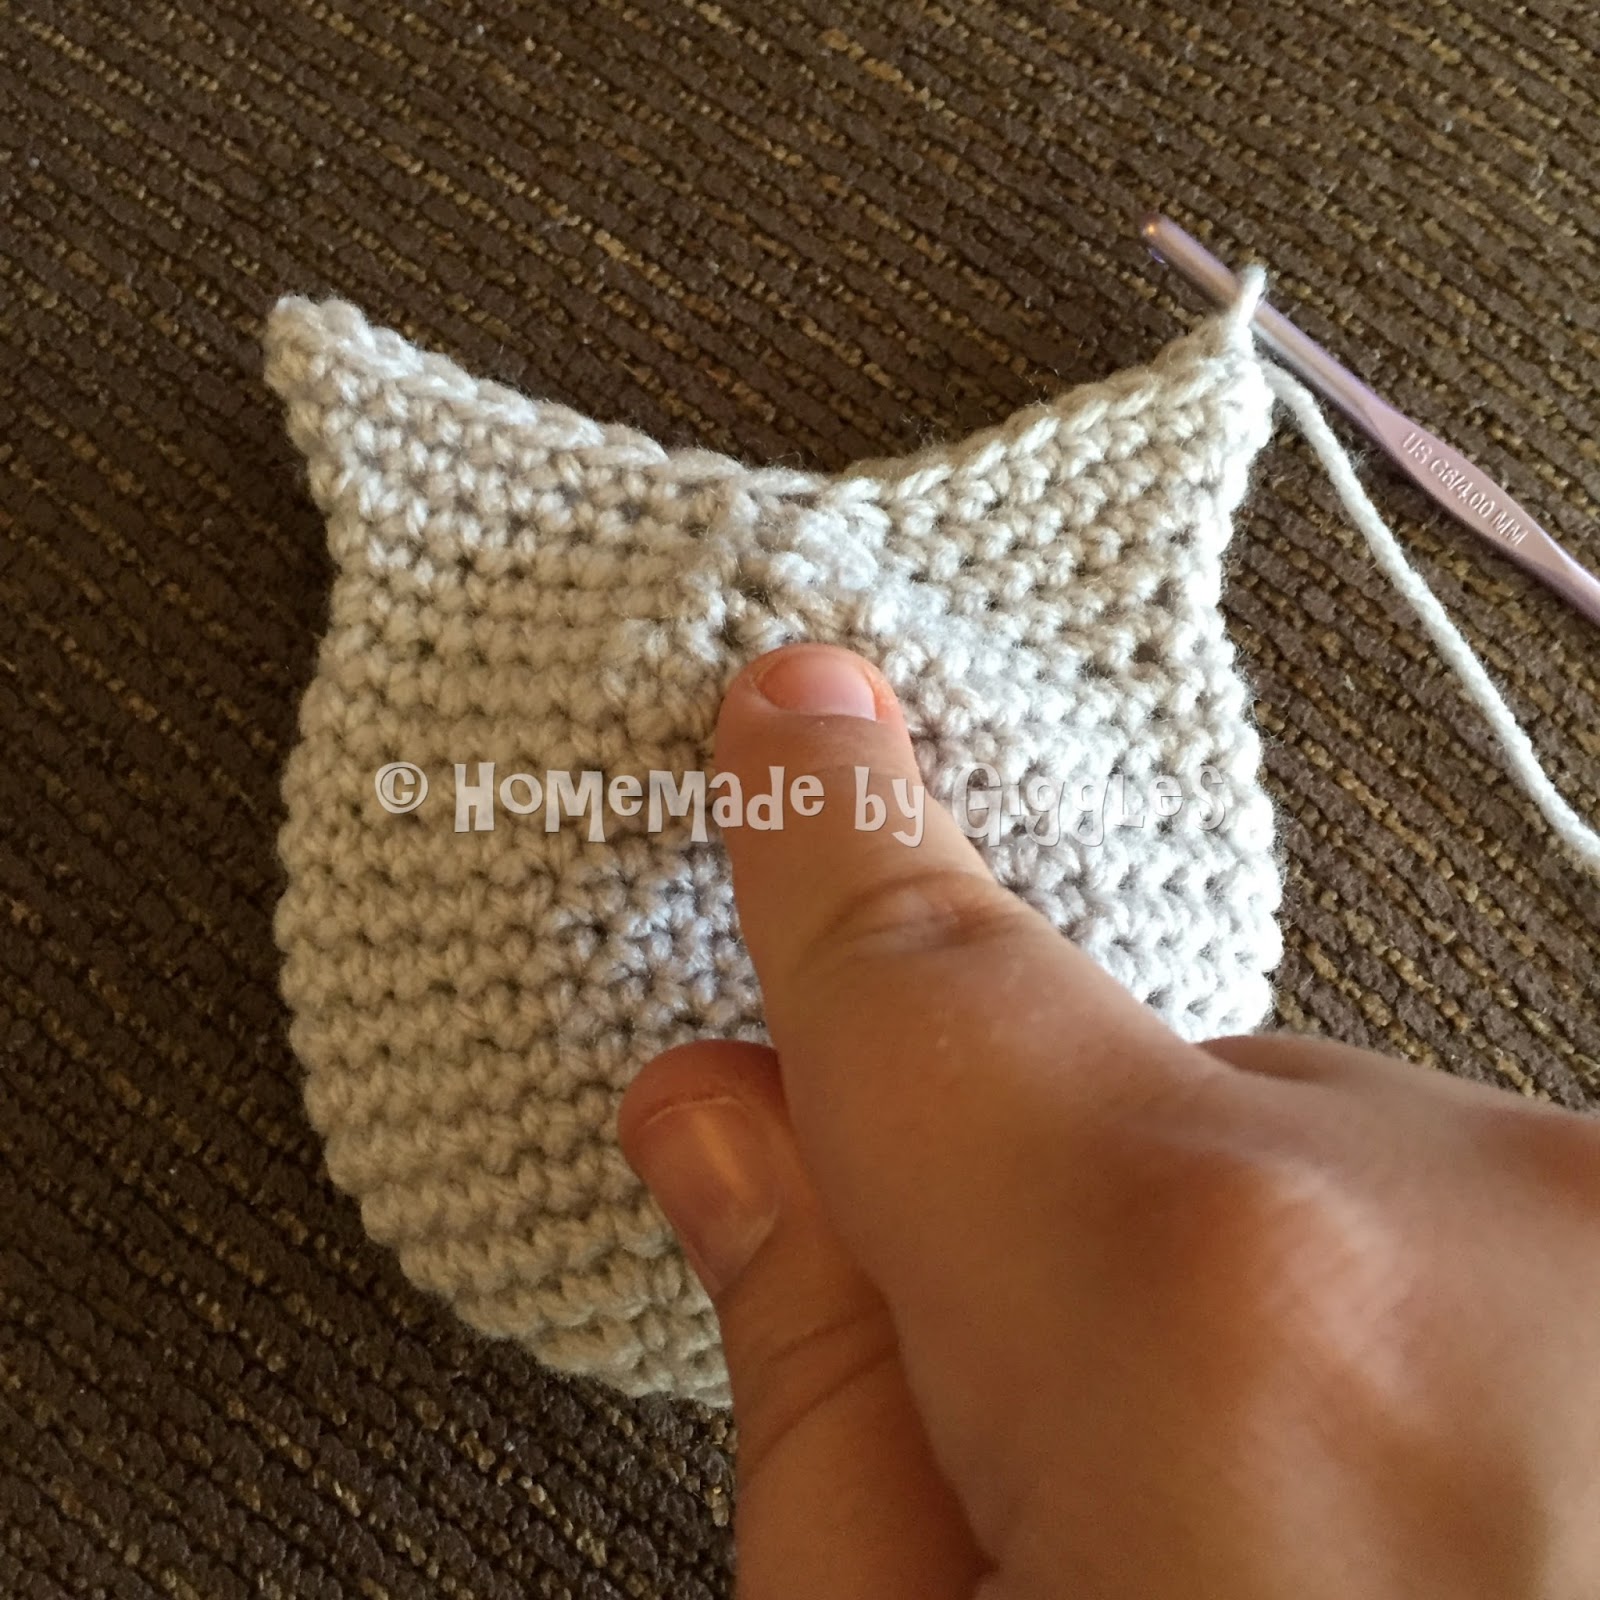
Basically, you are keeping the number of stitches the same (36). If you flatten the work, you will have 18 st in the 'front' and 18 in the 'back'. You want to build up the ears on the 2 sides and cinch in the middle of the front and back. This will make the ear shape get taller and the body be nice and round.
Think of breaking the 36 st down to 4 groups of 9. Think of each group of 9 stitches as having an 'ear side' (at the sides of the flattened round) and a 'middle side' which is in the middle of the front or back. You want to increase (2 sc in on st) on the 'ear side' and decrease (sc2tog) on the 'middle side' in each group of 9.
In the pattern you are starting at an 'ear side', so you do: 2 sc in next st, 6 sc, sc2tog. It takes the 9 st and you end up with 9 again, but you're changing the distribution of the stitches.

Body shape before Row 17

"Ear side" of first 9 st

"Middle side" of first 9 st

Close up of the increase (2 sc in st) on the "ear side" of the first 9 st

Close up of the decrease (sc2tog) on the "middle side" of the first 9 st
For the next 9 st, you start with the 'middle side', so you do: sc2tog, 6 sc, 2 sc in next st.
Then repeat along the back!
Repeat this 4 more times for a total of 5 rows, which creates a small seam in the middle of the front and back, and creates tall ear shapes.

Finished, unstuffed body, finishes on an "ear side"

"ear side" of finished body (there are two, one on each side)
"middle side" of finished body (there are two, one on front and one on back)
Hope this helps clarify any questions! Let me know if you have any more!
ASSEMBLY:
Video Instructions:
I've made a video to show the assembly instructions, please feel free to use it! If you'd rather not, there are assembly instructions with pictures below the video for you to use. I find assembly to be the most critical step for amigurumi projects like this - doing it properly will help you be as satisfied as possible with the end result!
Written Instructions
First, stuff the body. Since I used poly pellets, I added fabric to ensure no pellets sneak through the yarn, because that can be a choking hazard and also messy! I simply placed a piece of fabric into the owl, filled with the pellets and sewed the opening shut with a needle and thread. I followed the contour of the top opening. I like to pack as many beads in as I can to make it heavy like a bean bag, but it's totally up to you! If using batting, simply stuff it to your desired firmness.

Then, simply take the tail and sc across the top opening and weave in the end. The "front" of the body should be the side with the sc's facing forwards.

Next, attach the belly. Center it on the front and position it under the sc2tog rows of the front middle. The belly will wrap under to the bottom of the body. Sew in place and weave in ends.

Next, attach the safety eyes to the center of the eyes. Now, I find that there's often a small bit of the contrasting color showing up where the color change takes place. I take my needle, take a yarn end of the central eye color and simply cover the contrasting color as seen in the pictures below.

For eye placement, the eyes should touch in the middle (use the sc2tog stitches that make a seam of sorts on the front middle), and touch the top of the belly. The eyelashes should go along the top half of the eyes. Sew in place and weave in ends.

The wings will be attached across the top half of the wing, leaving the bottom half unsewn so the wings can be flipped out if you choose to. They should be centered under the side of the ears and the top should line up with where the bottom of the eyes are. Sew the top semi-circle and weave in ends.

For the feet, line them so that the center of the feet are in line with the center of the bottom (round 1 of the body pattern). Sew in place using the tail from the magic loop, keeping the sewing in a straight line only across the bottom. This will allow the feet to stick out properly when the owl is standing on the table.

Sew the beak in place between the eyes so that it touches the central eye color and the point is centered and comes onto the belly's first round.
To add hair (optional), insert the crochet hook into the top center sc from back to front. Pull hair strands through by the middle and secure in place, making 6 strands. Cut down to desired size with sharp scissors to avoid fraying, I find that 1" length is perfect because it stands on its own.

Enjoy your little Bean Bag Owl! So many fun color combinations possible!


Please feel free to make and sell items made from this pattern, but please link back to my post if you do. Please do not copy my pattern and claim it as your own, or publish the pattern elsewhere without permission. Happy crafting!
Link to pattern in Ravelry: Bean Bag Owl
Please note that all commenting has been closed, please go to my new website www.homemadebygiggles.com to this post and comment there instead!
Link to pattern in Ravelry: Bean Bag Owl
Please note that all commenting has been closed, please go to my new website www.homemadebygiggles.com to this post and comment there instead!